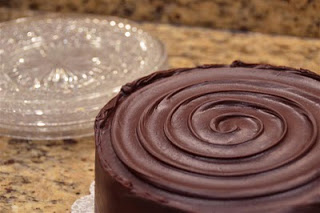
Red Velvet Chocolate Ganache Cake
Patricia @ ButterYum

I was going through some old photos and came across this cake that I never got around to posting. Great anytime of year, but especially appropriate for Christmas or Valentine’s Day. Enjoy!


Red Velvet Chocolate Ganache Cake
makes one double layer 8 or 9-inch cake
Ingredients
For the cake:
347g granulated sugar (12 1/4 ounces)
200g unsalted butter, softened (7 ounces, or 14 tablespoons)
312g all-purpose flour (11 ounces)
5g baking powder (1 teaspoon)
5g salt (1 1/2 teaspoons)
7g Dutch-processed cocoa, sifted (3 1/2 teaspoons)
210g buttermilk (7 1/2 ounces)
125g egg yolks (4 1/2 ounces)
10g pure vanilla extract (2 teaspoons)
60g red liquid food coloring (2 ounces or 4 tablespoons)
5g white distilled vinegar (1 teaspoon)
30g canola oil (2 tablespoons)
For the ganache:
800g heavy cream (3 1/4 cups)
800g bittersweet chocolate, chopped fine (1 3/4 pounds)
pinch of salt
Directions
To make the ganache (do this at least 4-5 hours before assembling the cake):
Place the chopped chocolate in a large glass or stainless steel bowl; set aside.
In a medium heavy-bottomed sauce pan over med-high heat, heat the cream and salt until it the mixture starts to bubble around the edges of the pan.
Immediately pour over the chopped chocolate and whisk or stir gently to incorporate the two ingredients together (avoid using a wooden spoon which can trap moisture and cause the chocolate to seize). I like to pass the mixture through a fine sieve to be sure no lumps remain, but you don't have to be that particular. If you plan to assemble the cake tomorrow, drape a clean kitchen towel (not plastic wrap or foil) over the bowl and allow it to sit undisturbed on the counter until needed (it will thicken to the perfect spreading consistency overnight). If you plan to assemble the cake on the same day, transfer the ganache to a shallow sheet pan which will speed up the cooling process, stirring every so often to aid crystallization.
To make the cake:
Preheat oven to 350F and prepare two 8 or 9-inch round cake pans with flour/oil baking spray and line bottom of pans with parchment; wrap pans with insulated cake strips (not necessary, but will eliminate domed layers).
In a large bowl, combine the flour, baking powder, salt, and sifted cocoa powder; whisk to combine and set aside.
In another bowl, combine the buttermilk, egg yolks, vanilla, food coloring, vinegar, and canola oil; set aside.
In the bowl of a stand mixer fitted with the paddle attachment or Beater Blade, cream butter and sugar together until the color turns from yellow to cream.
Turn the mixer off and add 1/3 of the flour mixture; mix on low until combined.
Turn the mixer off and add 1/2 of the buttermilk mixture; mix on low until combined.
Repeat by adding 1/3 of the flour mixture, the remaining 1/2 buttermilk mixture, and finally the remaining 1/3 flour mixture.
Increase speed to medium and beat for 2 minutes.
Evenly distribute among the 2 prepared cake pans.
Place in the center preheated oven and bake for 25-30 minutes, or until the cake surface springs back when pressed and a toothpick poked in the center of the cake comes out clean (a few crumbs are okay).
Remove from oven when done and cool for 5-10 minutes before unmolding onto a rack to cool completely.
Fill and frost with prepared ganache. Serve chilled or at room temperature - we like it chilled.
Notes
For even cake layers - wrap your cake pans with damp insulated baking strips - no more domed cakes!!
To make the swirl design - place the cake on a turntable. While turning the cake, use the tip of a large offset spatula and start in the center, then pull towards the outside of the cake.
*affiliate link